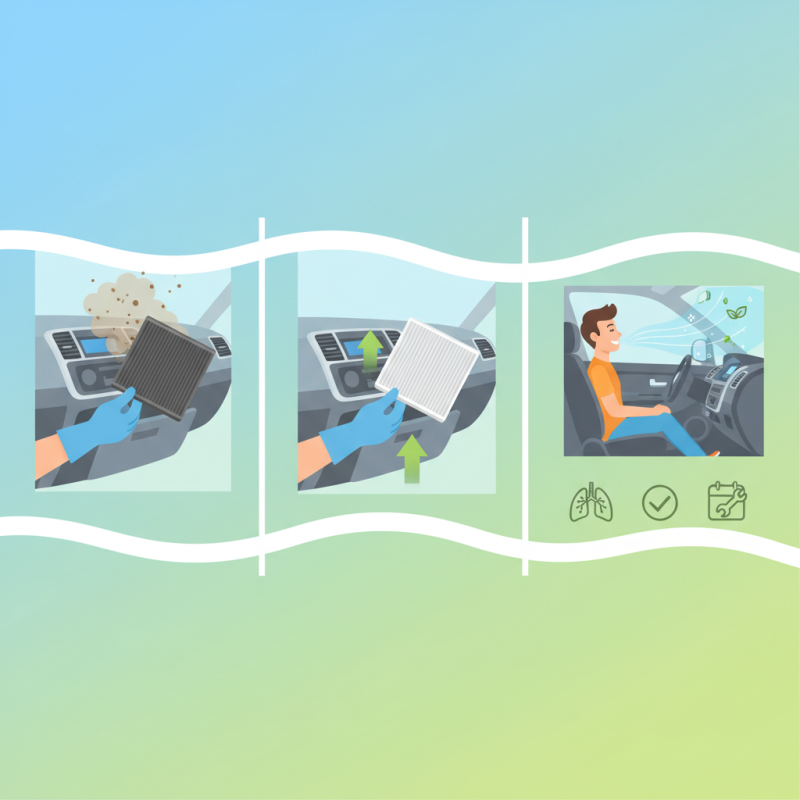
How to Replace a Cabin Filter in Your Car Easily?
The Cabin Filter plays a crucial role in maintaining air quality inside your vehicle. According to the Environmental Protection Agency, a vehicle’s cabin can contain pollutants at levels up to six times higher than outdoor air. Regular replacement of the cabin filter is essential. Studies show that neglecting this simple maintenance task can reduce filter effectiveness by over 50%.
Changing a cabin filter is often overlooked, yet it has significant benefits. A clean filter improves airflow and enhances the performance of the HVAC system. This, in turn, ensures that drivers and passengers breathe cleaner air, reducing allergens and irritants. Ideally, cabin filters should be replaced every 12,000 to 15,000 miles.
Despite this recommendation, many car owners forget to check or replace their filters regularly. This gap may lead to increased wear on the HVAC components. It is essential to take the time for this easy task, which aids in comfort and vehicle longevity. Regular maintenance can prevent larger issues down the road. Recognizing the value of a cabin filter can lead to a healthier driving experience.
Importance of Cabin Filter Maintenance for Vehicle Longevity
The cabin filter plays a crucial role in maintaining air quality inside your vehicle. A well-maintained cabin filter ensures that dust, pollen, and other pollutants do not enter the passenger area. According to the Specialty Equipment Market Association (SEMA), replacing the cabin filter can improve air quality by up to 50%. Neglecting this vital component can lead to reduced efficiency and increased strain on the HVAC system.
Regularly checking your cabin filter can also lead to longer vehicle longevity. A clogged filter can hinder airflow, causing the air conditioning and heating to work harder. This can lead to higher fuel consumption. The U.S. Department of Energy estimates that proper maintenance can enhance fuel economy by as much as 15%.
Tips: Consider replacing your cabin filter every 12,000 miles or once a year. Make a habit of inspecting it during seasonal tire changes. Look for signs of dirt and damage. A clean filter not only protects your health but also sustains your vehicle’s performance.
Always remember, consistency is key. Ignoring the cabin filter may yield short-term comfort, but it can cause long-term effects on your vehicle’s efficiency. Prioritize this small task, as it can save you money in the long run.
Identifying Symptoms of a Clogged Cabin Filter in Your Car
A clogged cabin filter can significantly affect your driving experience. According to industry reports, nearly 70% of drivers ignore this essential maintenance task. This neglect can lead to reduced air quality inside your car. Common symptoms of a clogged filter include poor airflow from the vents. It’s noticeable during both heating and cooling operations.
Another symptom is unpleasant odors. These can stem from trapped dust and mold in the filter. Studies show that a dirty cabin filter can reduce your HVAC system's efficiency by up to 15%. Drivers may also experience increased allergies. Pollutants can build up in the cabin, resulting in discomfort over time.
It's essential to pay attention to these signs. If you notice any persistent issues, it may be time for a filter replacement. Regular checks can save you from costly repairs in the long run. Many drivers underestimate this aspect of car maintenance. A clean cabin filter not only enhances air quality but also ensures a more enjoyable ride.
Cabin Filter Clogging Symptoms
Step-by-Step Guide to Locating Your Car's Cabin Filter
Locating your car's cabin filter can be a bit tricky. Start by checking your owner’s manual. It usually provides information about the filter's location. This filter can often be found behind the glove compartment or under the dashboard. If you’re unsure, a quick online search with your car model may help.
Once you have the location, gather the right tools. You might need a screwdriver or just your hands. Be careful when removing the cover. Sometimes it feels stuck or tight. Don’t rush; it can be frustrating. Take your time to avoid breaking any clips or housing.
Removing the old filter can be messy. Dust and debris may fall out, so have a vacuum handy. Inspect the new filter closely before installation. Make sure it matches the size of the old one. Pay attention to the airflow direction. Incorrect installation can lead to poor air quality. Reassembly should be straightforward, but double-check everything. It’s better to take a moment than to face issues later.
Tools and Materials Needed for an Easy Cabin Filter Replacement
When replacing a cabin filter, having the right tools is essential. You’ll need basic hand tools like a screwdriver and pliers. A flashlight can help you see into tight spaces. This makes the process easier. A small vacuum cleaner may be handy too, to clean the area before installing the new filter.
Materials are equally important. Make sure you have a new cabin filter that fits your vehicle. A clean, high-quality filter will improve air quality. It might also help you avoid issues later. You may also want some gloves to keep your hands clean. If you have any cleaning supplies, like wipes, using those can make the area cleaner and more pleasant.
Don’t forget to review the manual for your vehicle. Sometimes, little details can be easily overlooked during a DIY task. Ensure you check for any screws or fasteners that might be hidden. Taking your time can prevent mistakes. The goal is to create a better space in your car. A few extra minutes spent gathering tools can save time later.
Best Practices for Choosing the Right Cabin Filter for Your Vehicle
Choosing the right cabin filter for your vehicle can significantly improve air quality inside your car. It’s essential to select a filter that fits your specific make and model. Generic filters may not seal properly, leading to dust and pollutants entering the cabin. Always refer to your owner’s manual for specifications.
**Tip:** Check online forums or groups for recommendations. Other drivers often share insights about what worked best for them.
Consider the material of the filter. HEPA filters capture smaller particles than standard filters. They can be more effective for allergy sufferers. However, these filters may be pricier. Weigh the benefits against your budget. Sometimes, investing in a better filter is worth it.
**Tip:** Inspect your old filter. It can reveal how often you should replace it. If it’s dark and clogged, it’s time for a change.
Keep in mind that installation can vary. Some filters are easy to access, while others require more effort. Reflect on your comfort level with DIY projects. If you’re unsure, don’t hesitate to seek help.
How to Replace a Cabin Filter in Your Car Easily?
| Car Model | Cabin Filter Part Number | Replacement Interval (miles) | Filter Type | Price Range ($) |
| Toyota Camry | CF10117 | 15,000 | Activated Carbon | 15 - 30 |
| Honda Accord | 17113-SDA-A01 | 15,000 | HEPA | 20 - 40 |
| Ford Escape | FA1812 | 15,000 | Particle Filter | 15 - 25 |
| Chevrolet Malibu | CF10134 | 18,000 | Activated Carbon | 18 - 32 |
| Nissan Altima | 27277-3TA0A | 15,000 | HEPA | 20 - 35 |